
An Introduction to LVM Concepts, Terminology, and Operations:
LVM for Linux can simplify disk management. It makes it easier to manage disk space. LVM is a Logical Volume Manager that creates an abstraction layer between physical devices, such as disks and partitions, and volumes that are formatted with a file system.
If a file system requires more space, you can be added to its logical volumes from the free spaces in its volume group and you can also easily re-sized the file system as your requirement.
If any disk starts to fail, you can be replace the disk registered as a physical volume with the volume group and the logical volumes extents can be migrated to the new disk without data loss.
As an example, assume that the /home filesystem is configured on its own logical volume. If extra space is available on the volume group associated with /home, you can easily resize the file system. If no space is available, you can make more room by adding a new physical disk and allocating its storage capacity to the volume group. On LVM, volume groups are like storage pools and they aggregate together the capacity of multiple storage devices. Logical volumes reside on volume groups span multiple physical
Pros:
- LVM is flexible to expandable space at any time.
- LVM can be increase or decrease the size of the logical volume.
- Faulty disk easily replace.
- allows volume snapshots which are useful for backups.
- can be used to set up jbod without raid
Cons:
- That it is difficult to configure.
- More kernel support needed so some repair images might not work.
- it is used for storage configuration for servers and it is not so useful for Normal Linux Desktop users.
In this tutorial you will learn LVM for Linux step by step :
- Step 1: Create a Physical Partition
- Step 2:Create a Physical Volume
- Step 3: Create a Volume Group
- Step 4: Create a Logical Volume (LVM)
- Step 5: Make Use of a Logical Volume
- Step 6: Partition permanently Mount (fstab)
Logical Volume Manager (LVM for Linux)
To work with LVM, you need to understand how partitions configured for that purpose are used. First, with the fdisk, gdisk or parted utilities, you need to create partitions configured to the LVM partition type. You can also use an entire disk device.
1. Create a Physical Partition :
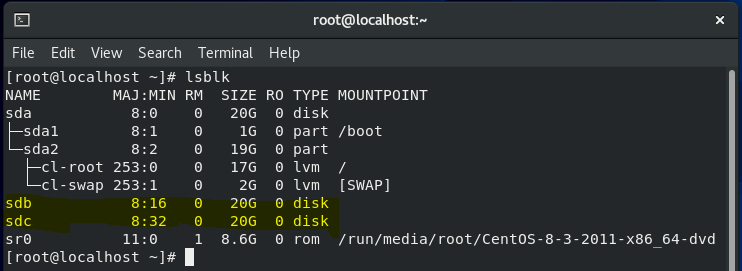
*This command help to show allocated and unallocated hard drive*
# lsblk
Use this command create partitions configured to the LVM for linux partition type :
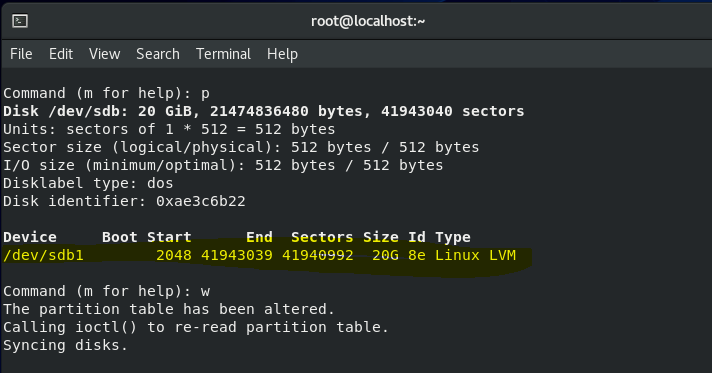
# fdisk /dev/sdb
Command (m for help): p
Command (m for help): n
Select (default p): p
Partition number (1-4, default 1): ENTER
First sector (2048-41943039, default 2048): ENTER
Last sector, +sectors or +size{K,M,G,T,P} (2048-41943039, default 41943039): ENTER
*Created a new partition 1 of type ‘Linux’ and of size 20 GiB.*
Command (m for help): l
Command (m for help): t
Hex code (type L to list all codes): 8e
Command (m for help): p
Command (m for help): w
# partprobe
* This same steps you will apply on /deb/sdc Hard drive partition for LVM for Linux.
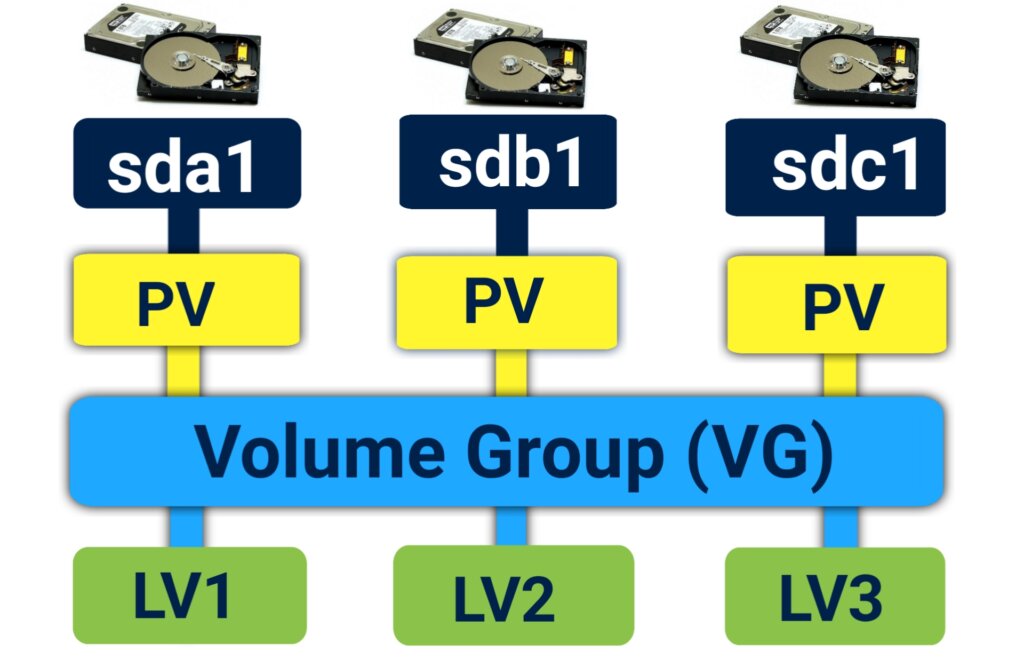
Once those partitions or disk devices are available, they need to be set up as physical volumes (PVs). That process initializes a disk or partition for use by LVM. Then, you create volume groups (VGs) from one or more physical volumes. Volume groups organize the physical storage in a collection of manageable disk chunks known as physical extents (PEs). With the right commands, you can then organize those PEs into logical volumes (LVS). Logical volumes are made of logical extents (LES), which map to the underlining PES. You can then format and mount the LVs. For those who are new to LVM, it may be important to break out each definition:
- Physical volume (PV): A PV is a partition or a disk drive initialized to be used by LVM for linux.
- Physical extent (PE): A PE is a small uniform segment of disk space. PVs are split into PES.
- Volume group (VG): A VG is a storage pool, made of one or more PVs.
- Logical extent (LE): Every PE is associated with an LE, and these PES can be combined into a logical volume.
- Logical volume (LV): An LV is a part of a VG and is made of LEs. An LV cat be formatted with a filesystem and then mounted on the directory of your choice.
You’ll see this broken down in the following sections. In essence, to create an LV system, you need to create a new PV using a command such as pvcreate, assign the space from one or more PVs to a VG with a command such as vgcreate, and allocate the space from some part of available VGs to an LV with a command such as lvcreate. for more…
To add space to an existing logical volume, you need to add free space from an existing VG with a command such as Ivextend. If you don’t have any existing VG space, you’ll need to add to it with unassigned PV space with a command such as vgextend. If all of your PV is taken, you may need to create a new PV from an unassigned partition or hard drive with the pvcreate command.
2. Create a Physical Volume :
The first step is to start with a physical partition or a hard disk drive. before Creating a Physical Volume you should be able to set up partitions to match the Linux LVM identifier. Then, to set up a new PV on a properly configured partition, such as /dev/sdb1. apply the pvcreate command to that partition:
# pvcreate /dev/sdb1
# pvcreate /dev/sdc1
# pvs
or
# pvdisplay ( for more infromation )
If there is more than one partition to be configured as a PV, the associated device files can all be listed in the same command:

3. Create a Volume Group :
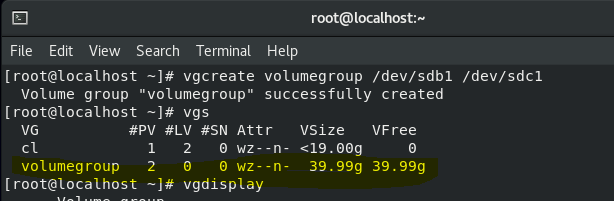
From one or more PVs, you can create a volume group (VG). In the following command, substitute the name of your choice for volumegroup.
#vgcreate volumegroup /dev/sdb1 /dev/sdb2
# vgs
Or
# vgdisplay
4. Create a Logical Volume (LVM) :
However, a new VG isn’t enough since you can’t format or mount a filesystem on it. So you need to create a logical volume (LV) for this purpose. The following command creates an LV. You can add as many chunks of disk space, in PEs, as you need.
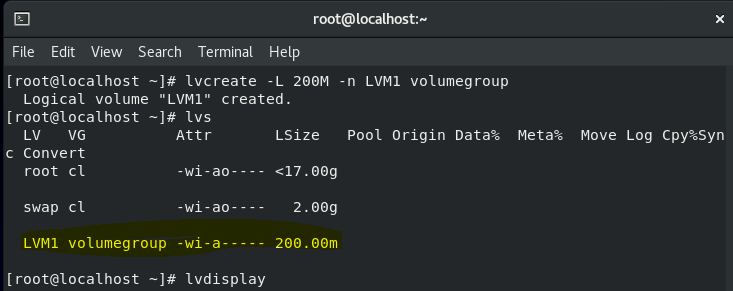
# lvcreate -L 200M volumegroup -n LVM1
# lvs
This creates a device named You can format this device as if it were a regular disk partition and then mount that new logical volume on a directory.
But this isn’t useful if you don’t know how much space is associated with each PE. You can use the vgdisplay command to display the size of the PEs, or specify the size with the-s option of the vgcreate command when you initialize the volume group. Alternatively, you can use the -L. switch to set a size in MB, GB, or another unit of measure. For example, the following command creates an LV named LVM1 of 200MB:
5. Make Use of a Logical Volume
That is not the last step. you may not get full credit unless the logical volume gets formatted and mounted when the system is rebooted. use the following command:
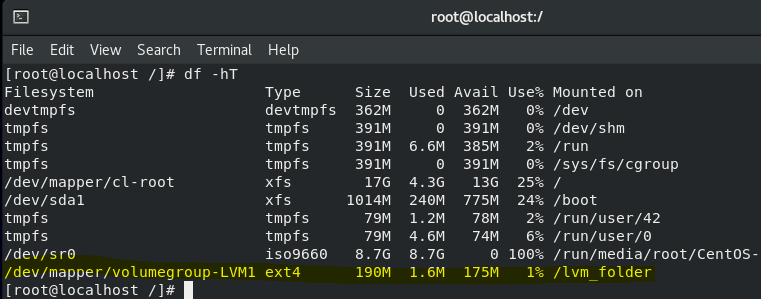
# mkfs.ext4 /dev/volumegroup/LVM1
# mkdir /lvm_folder
# mount /dev/volumegroup/LVM1 /lvm_folder/
# df -hT
6. Partition permanently Mount
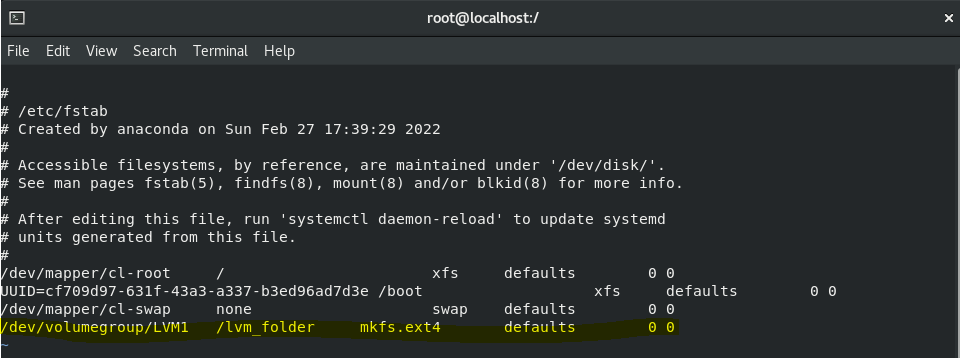
If you want to permanently mount this partition of you systems then, you will entry all of this information in “fstab”. Fstab is a file that are placed in /etc directory, which contains an entry for each file system, and each entry consists of six fields or columns.
# vi /etc/fstab
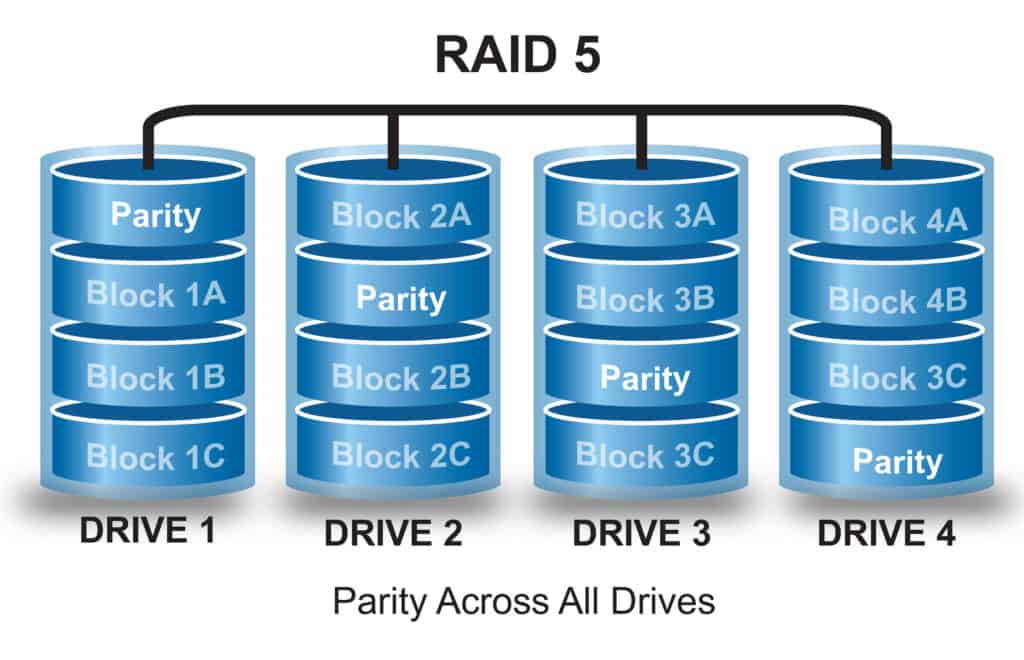
RAID 5 || RAID Configuration || What is Redundant array of inexpensive disks.
- Striping – RAID 0
- Mirroring – RAID 1
- Striping & Parity – RAID 5
- Striping & Double Parity – RAID 6
- Combining mirroring and parity – RAID 10
- Click here….