Nagios is a powerful monitoring system that enables organizations to identify and resolve IT infrastructure problems Nagios monitoring tool run on the Linux operating system and you can monitor devices running Linux, Windows and Unix operating systems. that provide a web-based graphical user interface (GUI).
Step: Installation Nagios monitoring tool
- Install require package (Ex: https, php, gcc glibc glibc-common etc…)
- Create User and group
- Downloads Nigios package and plaguing
- Install configure package and compile
- Set login user and password
- Install configure plaguing and compile
- Verify install package
- Troubleshooting Command ( if not open web GUI interface )
- Additional Configuration
Step 1: Install require package
Use “sudo su” command for change administrator mode
# sudo su
# yum install httpd php
# yum install gcc glibc glibc-common
# yum install gd gd-devel
Step 2: Create User and group
Use both command for create nagios user and set password
# adduser -m nagios
# passwd nagios
Create group and add nagios, apache user of that group
# groupadd nagioscmd
# usermod -a -G nagioscmd nagios
# usermod -a -G nagioscmd apache
Step 3: Downloads Nigios package and plaguing
Create and change directory for package and plaguing download
# mkdir ~/downloads
# cd ~/downloads
Use ” wget” for download package and plaguing
# wget https://assets.nagios.com/downloads/nagioscore/releases/nagios-4.4.5.tar.gz
# wget https://nagios-plugins.org/download/nagios-plugins-2.2.1.tar.gz
step 4: Install configure package and compile
Use those command for extract file and change directory
# tar zxvf nagios-4.0.8.tar.gz
# cd nagios-4.0.8
Install configuration package
# ./configure –with-command-group=nagioscmd
Use “make ” command for compile configuration package
# make all
# make install
# make install-init
# make install-config
# make install-commandmode
# make install-webconf
Step 5 : Set login user and password
# htpasswd -c /usr/local/nagios/etc/htpasswd.users nagiosadmin
# service httpd restart
# cd ~/downloads
Step 6: Install configure plaguing and compile
Use those command for extract file and change directory
# tar zxvf nagios-plugins-2.0.3.tar.gz
# cd nagios-plugins-2.0.3
Install configuration plaguing
# ./configure –with-nagios-user=nagios –with-nagios-group=nagios
Use “make ” command for compile configuration package
# make
# make install
enable boot time Use “chkconfig or systemctl” command
# chkconfig –add nagios
# chkconfig nagios on
————OR————–
# systemctl enable nagios
Step 7: Verify install package
# /usr/local/nagios/bin/nagios -v /usr/local/nagios/etc/nagios.cfg
Restart or start Nagios and http services
# service nagios start
# service httpd restart
Finally, you can login nagios web GUI interface on browser ( open: chrome )
http://192.168.1.10/nagios
user Name: nagiosadmin
password: “which have you set”
Troubleshooting Command
POSSIBLE ERRORS:**If Nagios web interface not working then following those step other wish can skip.
“/usr/local/nagios” are nagios Home files location
# ls -al /usr/local/nagios
# ls -alR /usr/local/nagios/var
—-Output—-
SELINUX:
setenforce 0
Plaguing location
# cd /usr/local/nagios/libexec/
Can’t access web page? Check firewalld and at port 80 through.
# firewall-cmd –zone=public –add-port=80/tcp –permanent
# firewall-cmd –reload
Still can’t access web page? Check IPV6 listening in the apache configuration.
# vi /etc/httpd/conf/httpd.conf
—— check and set ——-
Listen 0.0.0.0:80

# service httpd restart
Additional Configuration
If want to change contract details
# vi /usr/local/nagios/etc/objects/contacts.cfg

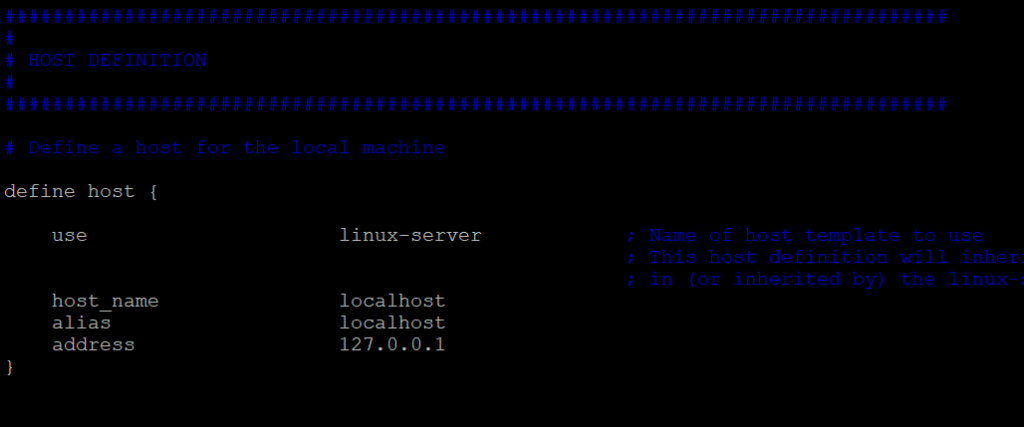
host machine add
# vi /usr/local/nagios/etc/objects/localhost.cfg
——–add Host ———
define host {
use linux-server
host_name localhost
alias localhost
address 127.0.0.1
}
———add services at last ———-
define service{
use local-service
host_name ftpserver.com
service_description FTP
check_command check_ftp
notifications_enabled 0
}
HOST DEFINITION

ADD SERVICE

————————–END—————————
Install Git in Linux | Git log, Push, Pull

- Install Git
- Set up Git
- Create working file
- Check git log
- Create GitHub Account
- Generate and copy 2FA password
- Push and Pull working data to Github account for use world wide.

wonderful issues altogether, you simply received a brand new reader. What would you suggest in regards to your publish that you made some days in the past? Any positive?
I enjoy the efforts you have put in this, thank you for all the great articles.